Elasticsearch集群知识笔记

Elasticsearch内部提供了一个rest接口用于查看集群内部的健康状况:

1
curl -XGET http://localhost:9200/_cluster/health

response结果:

1
2
3
4
5
{
"cluster_name": "format-es",
"status": "green",
...
}

这里的status有3种状态,分别是green(所有主分片和复制分片都可用),yellow(所有主分片可用,但不是所有复制分片都可用)和red(不是所有主分片可用)。

分片(Shard)

Elasticsearch中的索引(index)是由分片(shard)构成的。

比如我们集群中有个索引users,该索引由3个分片组成,那么这个users索引中的文档数据将分布在这3个分片中。

users索引中的文档是根据下面这个规则确定该文档属于哪个分片:

1
shard = hash(routing) % number_of_primary_shards // routing值默认是文档的_id,number_of_primary_shards是索引的主分片个数

这个routing默认是文档的_id,可以自定义(文章后面部分会举例说明)。

这3个分片可以进行复制,复制是为了实现容错性,比如复制1份,那么一共就需要6个分片(3个主分片+3个主分片复制出来的复制分片)。

users索引的创建命令(主分片3个,复制1份):

1
2
3
4
5
6
7
8
curl -XPUT http://localhost:9200/users -d '
{
"settings": {
"number_of_shards": 3,
"number_of_replicas": 1
}
}
'

创建完users索引之后,es集群(单节点)分片情况如下:

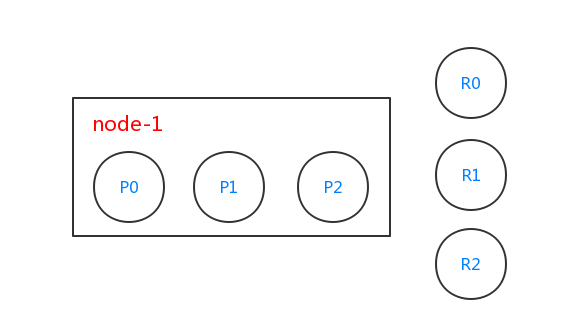
由于users索引有3个分片,es内部会创建出3个分片,分别是P0、P1和P2(大写P指的是primary),且这3个分片都是主分片。users索引需要对分片进行复制1份,所以这3个主分片都需要复制1份,分别对应R0、R1和R2这3个复制分片(大写R指的是replica)。这个时候我们的集群只有1个节点node-1,所以复制分片并没有起作用(如果复制分片和主分片在同一个节点了,那么这个复制分片的意义就不存在了。复制分片的意义在于容错性,当一个节点挂了,另一个节点上的分片可以代替挂掉节点上的分片)。

查看健康状态:

1
curl -XGET http://localhost:9200/_cluster/health

response结果:

1
2
3
4
5
6
7
8
9
10
11
12
13
14
15
16
17
{
"cluster_name": "format-es",
"status": "yellow",
"timed_out": false,
"number_of_nodes": 1,
"number_of_data_nodes": 1,
"active_primary_shards": 3,
"active_shards": 3,
"relocating_shards": 0,
"initializing_shards": 0,
"unassigned_shards": 3,
"delayed_unassigned_shards": 0,
"number_of_pending_tasks": 0,
"number_of_in_flight_fetch": 0,
"task_max_waiting_in_queue_millis": 0,
"active_shards_percent_as_number": 50
}

这里可以看到,集群的状态变成了yellow。这是因为users索引中的分片需要复制1份,但是没有足够的机器用来存储复制出来的复制分片,还有其它的一些字段比如unassigned_shards字段为3,对应R0、R1和R2这3个未分配的复制分片。

在集群中加入节点node-2,查看健康状况(这里使用伪集群。node-1节点对应9200端口的进程,node-2节点对应9201端口的进程):

1
curl -XGET http://localhost:9200/_cluster/health

response结果:

1
2
3
4
5
6
7
8
9
10
11
12
13
14
15
16
17
{
"cluster_name": "format-es",
"status": "green",
"timed_out": false,
"number_of_nodes": 2,
"number_of_data_nodes": 2,
"active_primary_shards": 3,
"active_shards": 6,
"relocating_shards": 0,
"initializing_shards": 0,
"unassigned_shards": 0,
"delayed_unassigned_shards": 0,
"number_of_pending_tasks": 0,
"number_of_in_flight_fetch": 0,
"task_max_waiting_in_queue_millis": 0,
"active_shards_percent_as_number": 100
}

主分片和复制分片均可用,status为green。

此时,es集群分片情况如下:

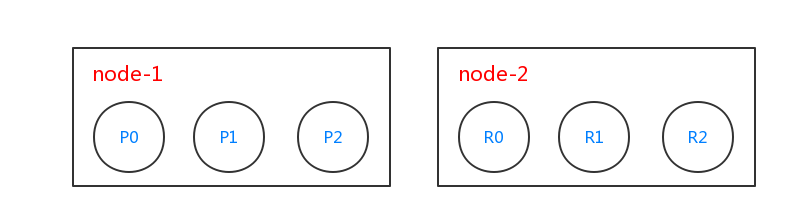
这个时候es集群由2个节点node-1和node-2组成,并且这2个节点上具有主分片和复制分片,具有容错性。

我们往users索引中插入一条文档:

1
2
3
4
5
6
curl -XPOST http://localhost:9200/users/normal -d '
{
"name" : "Format",
"age" : 111
}
'

返回:

1
2
3
4
5
6
7
8
9
10
11
12
{
"_index": "users",
"_type": "normal",
"_id": "AV0hs4LnkXxVJ5DURwXr",
"_version": 1,
"_shards": {
"total": 2,
"successful": 2,
"failed": 0
},
"created": true
}

从返回的信息中可以看到,这个文档已经被创建成功,并且2个分片都成功。id由es内部自动创建,值为AV0hs4LnkXxVJ5DURwXr。

读取id为AV0hs4LnkXxVJ5DURwXr的文档:

1
2
3
4
5
6
7
8
9
10
11
12
13
14
curl -XGET http://localhost:9200/users/normal/AV0hs4LnkXxVJ5DURwXr

# 结果
{
"_index": "users",
"_type": "normal",
"_id": "AV0hs4LnkXxVJ5DURwXr",
"_version": 1,
"found": true,
"_source": {
"name": "Format",
"age": 111
}
}

这个时候如果节点node-1挂了,读取数据:

1
2
3
4
5
6
7
8
9
10
11
12
13
14
curl -XGET http://localhost:9201/users/normal/AV0hs4LnkXxVJ5DURwXr

# 结果
{
"_index": "users",
"_type": "normal",
"_id": "AV0hs4LnkXxVJ5DURwXr",
"_version": 1,
"found": true,
"_source": {
"name": "Format",
"age": 111
}
}

在节点node-1已经挂了的情况下还是读取到了之前插入的文档。这是因为我们users索引会复制2份,node-1节点虽然已经挂了,但是node-2节点上这个文档的数据还在,所以文档会被读取到。

在node-1节点挂掉的情况下,再次插入一条文档:

1
2
3
4
5
6
curl -XPOST http://localhost:9201/users/normal -d '
{
"name" : "Jim",
"age" : 66
}
'

返回:

1
2
3
4
5
6
7
8
9
10
11
12
{
"_index": "users",
"_type": "normal",
"_id": "AV0qMto5dJHprgu99sSN",
"_version": 1,
"_shards": {
"total": 2,
"successful": 1,
"failed": 0
},
"created": true
}

这里看到返回的数据中,这个文档对应的分片只有1个成功插入,因为另1个分片对应的节点已经挂了。

然后读取这个新插入的文档:

1
2
3
4
5
6
7
8
9
10
11
12
13
14
curl -XGET http://localhost:9201/users/normal/AV0qMto5dJHprgu99sSN

# 结果
{
"_index": "users",
"_type": "normal",
"_id": "AV0qMto5dJHprgu99sSN",
"_version": 1,
"found": true,
"_source": {
"name": "Jim",
"age": 66
}
}

然后node-1节点恢复(节点恢复之后,es内部会自动从数据全的分片中复制数据到数据少的分片上,保证高可用),然后读取数据:

1
2
3
4
5
6
7
8
9
10
11
12
13
14
curl -XGET http://localhost:9200/users/normal/AV0qMto5dJHprgu99sSN

# 结果
{
"_index": "users",
"_type": "normal",
"_id": "AV0qMto5dJHprgu99sSN",
"_version": 1,
"found": true,
"_source": {
"name": "Jim",
"age": 66
}
}

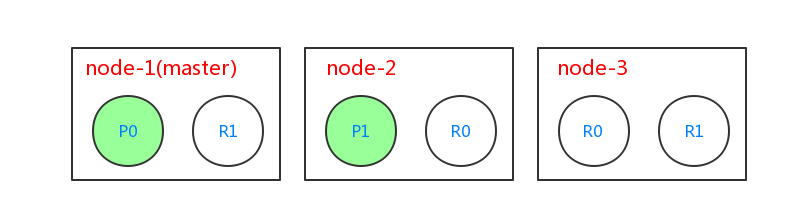
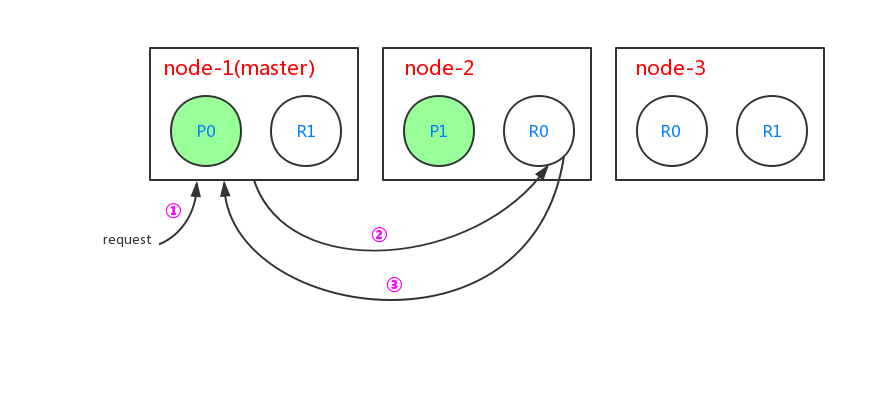
ES中文档的新建、删除和修改都是先在主分片上完成的,在主分片上完成这些操作以后,才会进行复制操作。比如有3个节点node-1、node-2和node-3,索引blogs有2个主分片,并且复制2份,集群结构如下:

当进行新建文档的时候过程如下:

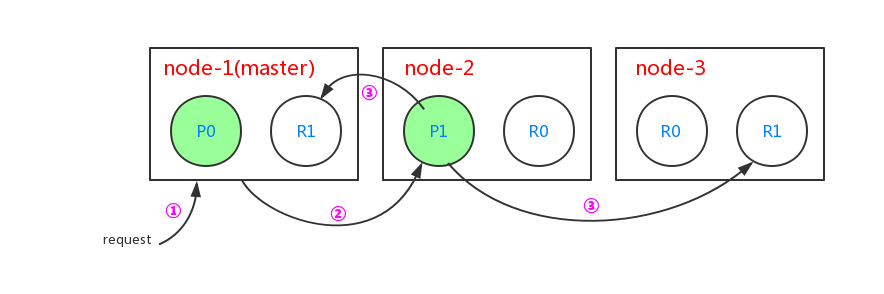
  1. 客户端给master节点node-1发送新建文档的请求
  2. node-1节点根据文档的_id,确定该文档属于属于分片1。分片1的主分片在节点node-2上,故将请求转发到node-2
  3. node-2上的主分片P1处理文档成功,然后转发请求到node-1和node-3节点上的复制节点上。当所有的复制节点报告成功后,node-2节点报告成功到请求的节点,请求节点再返回给客户端

当进行检索文档的时候过程如下:

  1. 客户端给master节点node-1发送检索文档的请求
  2. node-1节点根据文档的_id,确定该文档属于分片0。分片0在3个节点中都存在,本次请求中使用节点node-2,于是将请求转发给node-2节点
  3. node-2节点得到文档数据,并返回给node-1节点,node-1节点返回给客户端

这里es集群会使用轮询的策略对读取不同节点上的分片中的文档数据,比如针对上图中的查询,下次查询就会读取node-3节点上的R0分片中的文档。

当对文档进行局部更新的时候过程如下:

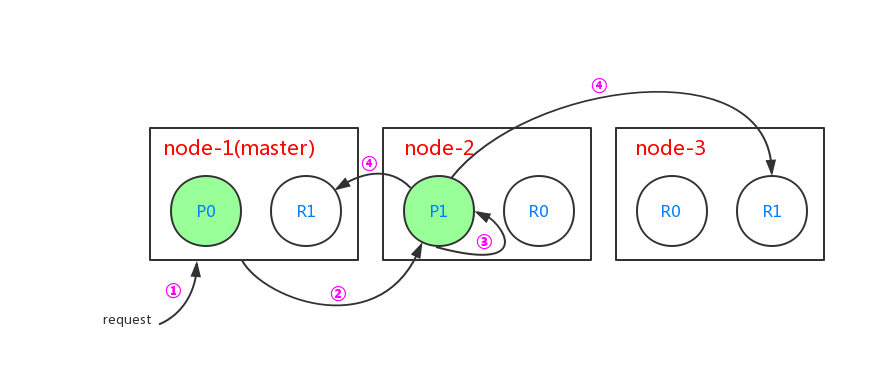
  1. 客户端给master节点node-1发送局部更新文档的请求
  2. node-1节点根据文档的_id,确定该文档属于分片1,并发现找到分片1的主分片在node-2节点上,转发请求到node-2节点上
  3. node-2节点在主分片P1中找出对应id的文档,修改文档内部的_source属性,之后对文档重建索引。如果这个文档已经被其它进程修改,会重试步骤3 retry_on_conflict 次数(retry_on_conflict可通过参数设置)
  4. 如果步骤3执行成功,node-2节点转发新版本的文档给node-1和node-3节点上的复制分片,这2个节点对文档进行重建索引。一旦node-1和node-3节点上的复制分片处理成功,node-2节点返回成功给node-1节点,node-1节点返回给客户端

节点(Node)

在分布式集群情况下,ES中的节点可分为4类:

  1. master节点:配置文件中node.master属性为true(默认为true),就有资格被选为master节点,master节点用于控制整个集群的操作。比如创建或删除索引,管理其它非master节点等
  2. data节点:配置文件中node.data属性为true(默认为true),就有资格被设置成data节点,data节点主要用于执行数据相关的操作。比如文档的CRUD
  3. 客户端节点:配置文件中node.master属性和node.data属性均为false。该节点不能作为master节点,也不能作为data节点。可以作为客户端节点,用于响应用户的请求,把请求转发到其他节点
  4. 部落节点:当一个节点配置tribe.*的时候,它是一个特殊的客户端,它可以连接多个集群,在所有连接的集群上执行搜索和其他操作

查询集群状态的Rest接口

可以通过es内部提供的rest接口查看master节点:

1
2
3
4
curl -XGET http://localhost:9200/_cat/master?v

id host ip node
9FINsHCpTKqcpFlnnA4Yww 10.1.251.164 10.1.251.164 node-1

查看节点信息:

1
2
3
4
5
6
curl -XGET http://localhost:9200/_cat/nodes?v

host ip heap.percent ram.percent load node.role master name
10.1.251.164 10.1.251.164 6 100 5.48 d * node-1
10.1.251.164 10.1.251.164 6 100 5.48 d m node-3
10.1.251.164 10.1.251.164 7 100 5.48 d m node-2

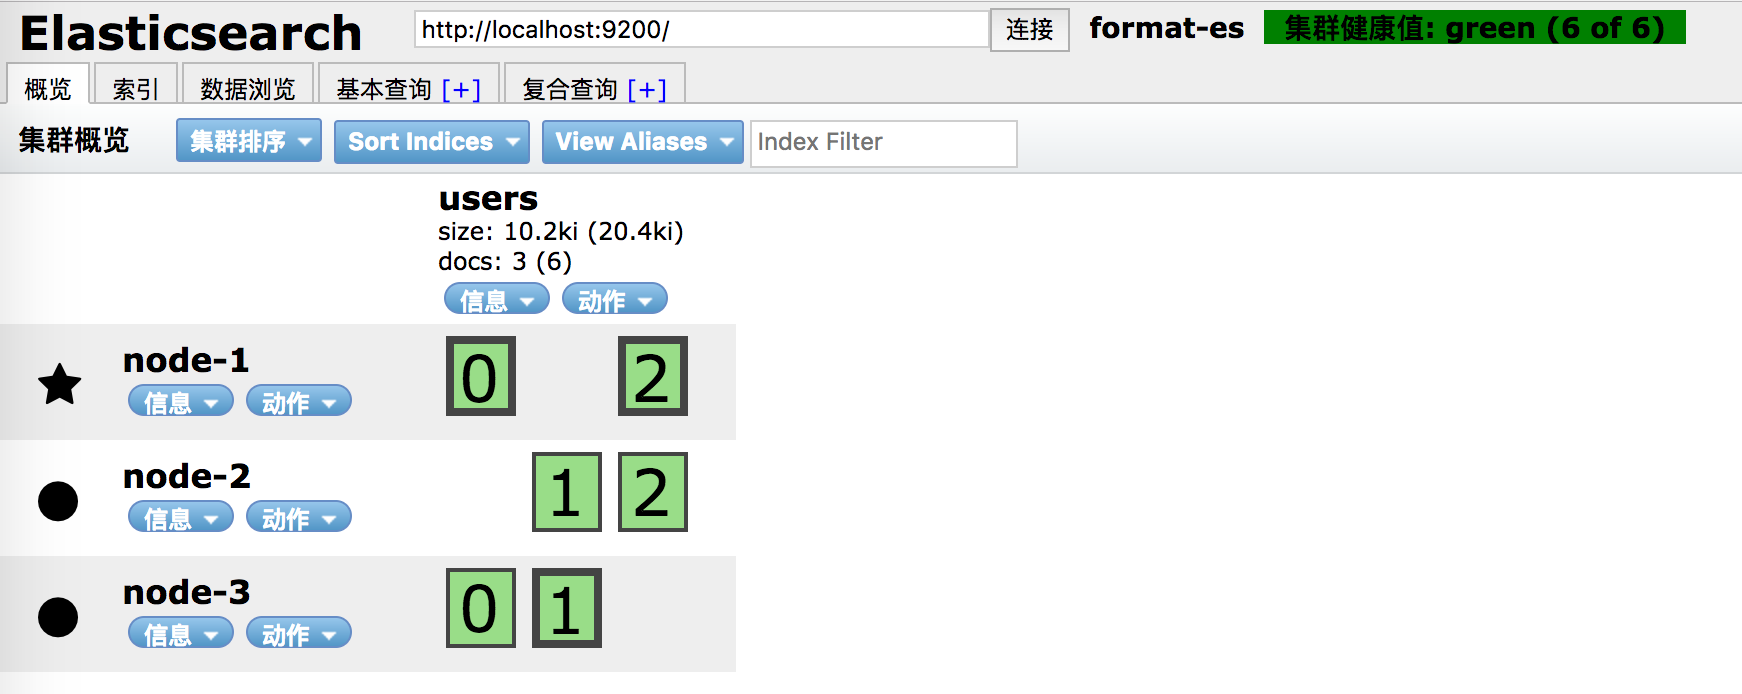
或者使用head插件查看节点情况。图中带有五角星的节点是master,这里users索引有3个主分片和3个复制分片(绿色框外部加粗的边框就是主分片,否则就是复制分片):

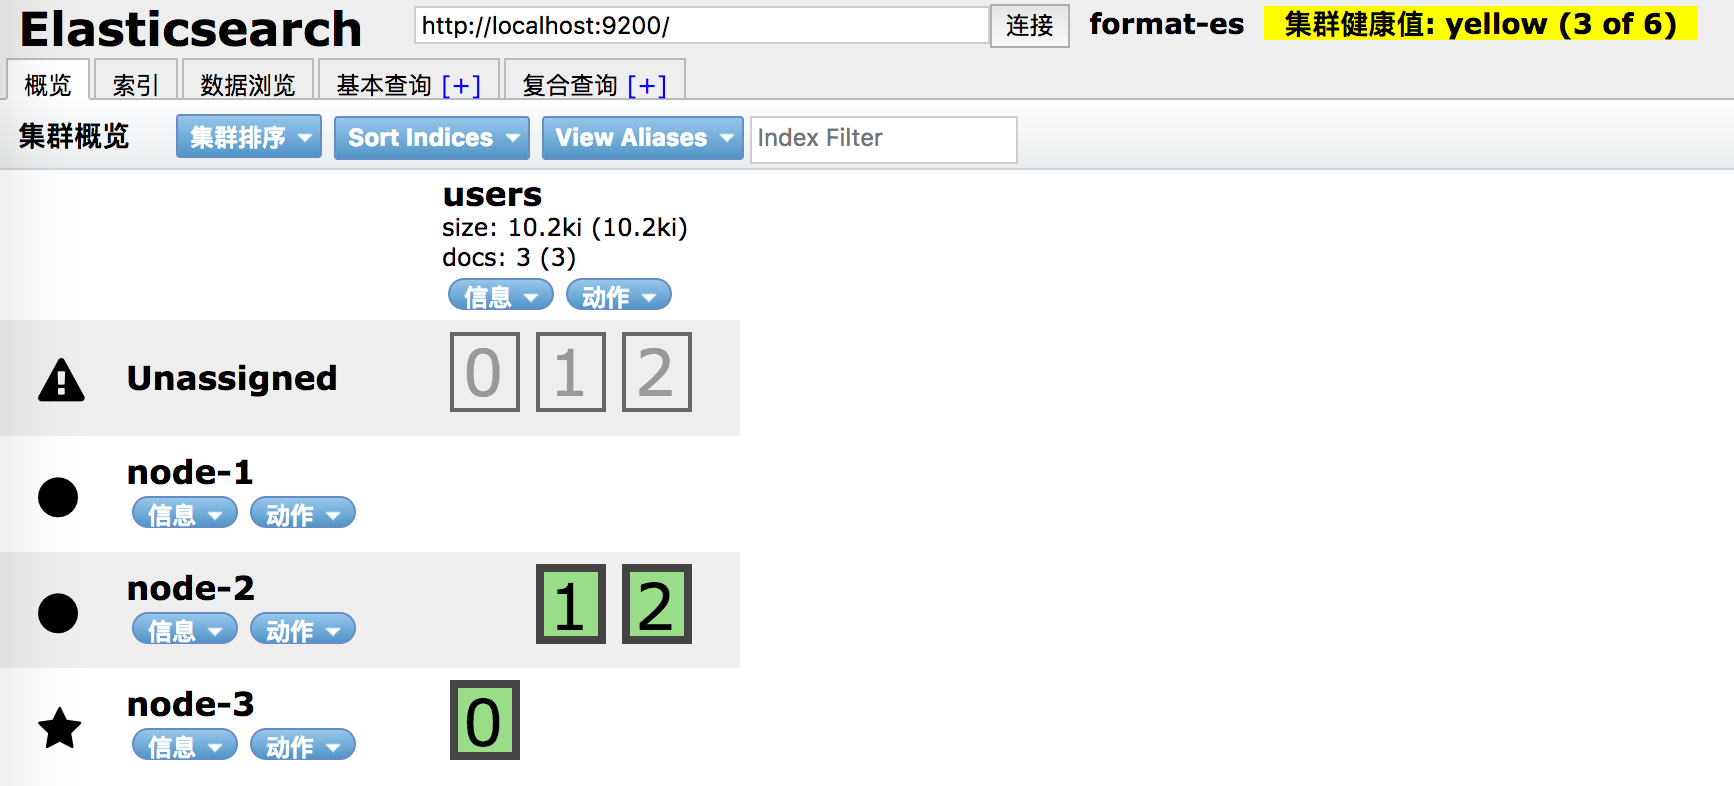
如果我们的集群上node-1节点由于硬盘容量不足导致不可用时,head插件情况如下(3个复制节点未被分配,健康状况为黄色):

也可使用es内部的rest接口查看分片信息:

1
2
3
4
5
6
7
8
9
curl -XGET http://localhost:9200/_cat/shards?v

index shard prirep state docs store ip node
users 1 p STARTED 1 3.3kb 10.1.251.164 node-2
users 1 r UNASSIGNED
users 2 p STARTED 0 159b 10.1.251.164 node-2
users 2 r UNASSIGNED
users 0 p STARTED 2 6.6kb 10.1.251.164 node-3
users 0 r UNASSIGNED

routing参数决定如何分片(可以在index、get、delete、update、bulk等方法中使用),我们覆盖默认的routing为_id的默认策略:

1
2
3
4
5
6
7
8
9
10
11
12
13
14
15
16
17
18
19
20
21
22
23
24
25
26
27
28
29
30
31
32
33
34
35
36
37
38
39
40
# 执行10次
curl -XPOST http://localhost:9200/users/normal?routing=1 -d '
{
"name" : "Format345",
"age" : 456
}
'

# 执行1次
curl -XPOST http://localhost:9200/users/normal -d '
{
"name" : "Format345",
"age" : 456
}
'

# 使用routing参数得到文档的结果(多了个_rouring属性)
{
"_index": "users",
"_type": "normal",
"_id": "AV07AubA6HDSJNRJle0i",
"_version": 1,
"_routing": "1",
"found": true,
"_source": {
"name": "Format345",
"age": 456
}
}

# 查询文档分布情况(前面10次分布到了P2分片,后面1次分布到了P1分片)
curl -XGET http://localhost:9200/_cat/shards?v

index shard prirep state docs store ip node
users 1 p STARTED 2 3.3kb 10.1.251.164 node-2
users 1 r UNASSIGNED
users 2 p STARTED 10 159b 10.1.251.164 node-2
users 2 r UNASSIGNED
users 0 p STARTED 2 6.6kb 10.1.251.164 node-3
users 0 r UNASSIGNED

官网上有更多关于_cat api_cluster api相关的文档。

文档操作

es中文档的操作可以使用其内部提供的rest接口,使用过程中可以指定一些参数修改默认行为。

1.replication:用于设置复制分片的处理过程是同步还是异步。默认值是sync(主分片需要等待复制分片全部处理完毕),也可以设置成async(主分片不需要等待复制分片的处理过程,但是还是会转发请求给复制分片,这个转发过程是异步的)。该参数在2.0.0版本后已经被废弃,因为异步转发给复制分片的话,不知道复制分片是否成功与否,而且复制分片在还没有处理完成的情况下由于一直过来的异步请求而导致es过载,不建议使用async

2.consistency:写文档的一致性参数,可以设置成one,quorum和all;分别表示主分片可用即可、过半分片可用[公式:int( (primary + number_of_replicas) / 2 ) + 1]以及全部分片可用。比如有个blogs索引,有3个主分片,并且复制2份,当集群中的1个节点挂了,并使用all的话,将会抛出异常:

1
2
3
4
5
6
7
8
9
10
11
12
13
14
15
16
17
18
19
20
curl -XPOST http://localhost:9200/blogs/normal?consistency=all -d '
{
"name" : "POST-1"
}
'

# 一分钟后抛出异常
{
"error": {
"root_cause": [
{
"type": "unavailable_shards_exception",
"reason": "[blogs][0] Not enough active copies to meet write consistency of [ALL] (have 2, needed 3). Timeout: [1m], request: [index {[blogs][normal][AV1AF1FEl7qPpRBCQMV7], source[{\n \"name\" : \"POST-1\"\n}]}]"
}
],
"type": "unavailable_shards_exception",
"reason": "[blogs][0] Not enough active copies to meet write consistency of [ALL] (have 2, needed 3). Timeout: [1m], request: [index {[blogs][normal][AV1AF1FEl7qPpRBCQMV7], source[{\n \"name\" : \"POST-1\"\n}]}]"
},
"status": 503
}

使用默认的quorum策略:

1
2
3
4
5
6
7
8
9
10
11
12
13
14
15
16
17
18
19
curl -XPOST http://localhost:9200/blogs/normal -d '
{
"name" : "POST-1"
}

# 由于集群中的节点挂了1个,所分片只有2个success
{
"_index": "blogs",
"_type": "normal",
"_id": "AV1AckLfl7qPpRBCQMV_",
"_version": 1,
"_shards": {
"total": 3,
"successful": 2,
"failed": 0
},
"created": true
}
'

consistency参数在5.0.0版本已经被弃用

3.timeout:当分片不足的时候,es等待的时间(等待节点重新启动,分片恢复),默认为1分钟,可以进行修改,改成10秒:

1
2
3
4
5
6
7
8
9
10
11
12
13
14
15
16
17
18
19
20
curl -XPOST http://localhost:9200/blogs/normal?consistency=all&timeout=10s -d '
{
"name" : "POST-1"
}
'

# 10秒后抛出异常
{
"error": {
"root_cause": [
{
"type": "unavailable_shards_exception",
"reason": "[blogs][1] Not enough active copies to meet write consistency of [ALL] (have 2, needed 3). Timeout: [10s], request: [index {[blogs][normal][AV1AdXxsl7qPpRBCQMWB], source[{\n \"name\" : \"POST-1\"\n}]}]"
}
],
"type": "unavailable_shards_exception",
"reason": "[blogs][1] Not enough active copies to meet write consistency of [ALL] (have 2, needed 3). Timeout: [10s], request: [index {[blogs][normal][AV1AdXxsl7qPpRBCQMWB], source[{\n \"name\" : \"POST-1\"\n}]}]"
},
"status": 503
}

4.version

es中每个文档都有对应的版本信息,可以使用version版本参数用来实现并发情况下的乐观锁机制:

1
2
3
4
5
6
7
8
9
10
11
12
13
14
15
16
17
18
19
20
21
22
23
24
25
26
27
28
29
30
31
32
33
34
35
36
37
38
39
40
41
42
43
44
45
46
47
48
49
50
51
52
53
54
55
56
57
58
59
60
61
62
63
64
65
66
67
68
69
70
71
72
73

# 新建一个文档
curl -XPUT http://localhost:9200/blogs/normal/format-001 -d '
{
"name" : "format-post-001"
}
'

# 结果
{
"_index": "blogs",
"_type": "normal",
"_id": "format-001",
"_version": 1,
"_shards": {
"total": 3,
"successful": 3,
"failed": 0
},
"created": true
}

# id为format-001的文档目前的version为1,进行更新

# 用version为2去更新

curl -XPUT http://localhost:9200/blogs/normal/format-001?version=2 -d '
{
"name" : "format-post-001-001"
}
'

# 报错,版本冲突
{
"error": {
"root_cause": [
{
"type": "version_conflict_engine_exception",
"reason": "[normal][format-001]: version conflict, current [1], provided [2]",
"shard": "0",
"index": "blogs"
}
],
"type": "version_conflict_engine_exception",
"reason": "[normal][format-001]: version conflict, current [1], provided [2]",
"shard": "0",
"index": "blogs"
},
"status": 409
}

# 用version为1去更新

curl -XPUT http://localhost:9200/blogs/normal/format-001?version=1 -d '
{
"name" : "format-post-001-001"
}
'

# 更新成功,文档版本变成2

{
"_index": "blogs",
"_type": "normal",
"_id": "format-001",
"_version": 2,
"_shards": {
"total": 3,
"successful": 3,
"failed": 0
},
"created": false
}

5.op_type:可以指定本次操作的类型,比如create操作。

1
2
3
4
5
6
7
8
9
10
11
12
13
14
15
16
17
18
19
20
21
22
23
24
25
26
27
28
29
30
31
32
33
34
35
36
37
38
39
40
41
42
43
44
45
# 创建一个id为1,type为normal,在blogs索引中的文档
curl -XPUT http://localhost:9200/blogs/normal/1?op_type=create -d '
{
"name" : "POST-2"
}
'

{
"_index": "blogs",
"_type": "normal",
"_id": "1",
"_version": 1,
"_shards": {
"total": 3,
"successful": 3,
"failed": 0
},
"created": true
}

# 继续调用同一个操作
curl -XPUT http://localhost:9200/blogs/normal/1?op_type=create -d '
{
"name" : "POST-2"
}
'

# 报错,文档已经存在
{
"error": {
"root_cause": [
{
"type": "document_already_exists_exception",
"reason": "[normal][1]: document already exists",
"shard": "0",
"index": "blogs"
}
],
"type": "document_already_exists_exception",
"reason": "[normal][1]: document already exists",
"shard": "0",
"index": "blogs"
},
"status": 409
}

可以不使用op_type操作,在url中指定。这两种方法效果是一样的

http://localhost:9200/blogs/normal/1/_create 效果跟 http://localhost:9200/blogs/normal/1?op_type=create 是一样的。

目前支持的op_type有create(只支持创建文档)和index(支持创建和更新文档)。

6.wait_for_active_shards

在5.0.0版本新引入的一个参数,表示等待活跃的分片数。作用跟consistency类似,可以设置成all或者任意正整数。

比如在这种场景下:集群中有3个节点node-1、node-2和node-3,并且索引中的分片需要复制3份。那么该索引一共拥有4个分片,包括1个主分片和3个复制分片。

默认情况下,索引操作只需要等待主分片可用(wait_for_active_shards为1)即可。

如果node-2和node-3节点挂了,索引操作是不会受影响的(wait_for_active_shards默认为1);如果设置了wait_for_active_shards为3,那么需要3个节点全部存活;如果设置了wait_for_active_shards为4或者all(一共4个分片,4和all是一样的效果),那么该集群中的索引操作永远都会失败,因为集群一共就3个节点,不能处理所有的4个分片。

比如设置成all,则会抛出如下错误:

1
2
3
4
5
6
7
8
9
10
11
12
13
{
"error": {
"root_cause": [
{
"type": "unavailable_shards_exception",
"reason": "[blogs][2] Not enough active copies to meet shard count of [ALL] (have 3, needed 4). Timeout: [1m], request: [index {[blogs][normal][AV1QVDz3RpA5iuXn159C], source[{\n \"name\" : \"POST-1\"\n}]}]"
}
],
"type": "unavailable_shards_exception",
"reason": "[blogs][2] Not enough active copies to meet shard count of [ALL] (have 3, needed 4). Timeout: [1m], request: [index {[blogs][normal][AV1QVDz3RpA5iuXn159C], source[{\n \"name\" : \"POST-1\"\n}]}]"
},
"status": 503
}

wait_for_active_shards的默认值可以在定义索引的时候进行设置,也可以动态地进行修改:

1
2
3
4
5
curl -XPUT http://localhost:9200/blogs/_settings -d '
{
"index.write.wait_for_active_shards": 3
}
'

7.自动生成id

创建文档的时候,可以不指定id,es会自动为你生成1个id,需要注意的话需要使用POST方式,而不是PUT方式。

1
2
3
4
5
6
7
8
9
10
11
12
13
14
15
16
17
18
19

curl -XPOST http://localhost:9200/blogs/normal -d '
{
"name" : "my-post"
}
'

{
"_index": "blogs",
"_type": "normal",
"_id": "AV1Pj6MdAuPf3r3i0ysL", # 自动生成的id
"_version": 1,
"_shards": {
"total": 3,
"successful": 3,
"failed": 0
},
"created": true
}

8.文档的局部更新

1
2
3
4
5
6
7
8
9
10
11
12
13
14
15
16
17
18
19
20
21
22
23
24
25
26
27
28
29
30
31
32
33
34
35
36
37
38
39
40
41
42
43
44
45
46
47
48
49
50
51
52
53
54
55
56
57
58
59
60
61
62
63
64
65
66
67
68
69
70
71
72
73
74
75
76
77
78
79
80
81
82
83
84
85
86
87
88
89
90
91
92
93
94
95
96
97
98
99
100
101
102
103
104
105
106
107
108
109
110
111
112
113
114
115
116
117
118
119
120
121
122
123
124
125
126
127
128
129
130
131
132
133
134
135
136
137
# 新建文档
curl -XPUT http://localhost:9200/blogs/normal/format-doc-001 -d '
{
"title" : "springboot in action",
"author" : "Format"
}
'

# 执行全更新操作
curl -XPUT http://localhost:9200/blogs/normal/format-doc-001 -d '
{
"create_at": "2017-07-18"
}
'

# 获取文档
curl -XGET http://localhost:9200/blogs/normal/format-doc-001

{
"_index": "blogs",
"_type": "normal",
"_id": "format-doc-001",
"_version": 2,
"found": true,
"_source": {
"create_at": "2017-07-18"
}
}

# 使用文档局部更新

curl -XPOST http://localhost:9200/blogs/normal/format-doc-001/_update -d '
{
"doc": {
"title" : "springboot in action",
"author" : "Format"
}
}
'

# 获取文档
curl -XGET http://localhost:9200/blogs/normal/format-doc-001

{
"_index": "blogs",
"_type": "normal",
"_id": "format-doc-001",
"_version": 3,
"found": true,
"_source": {
"create_at": "2017-07-18",
"author": "Format",
"title": "springboot in action"
}
}

# 使用脚本局部更新
curl -XPOST http://localhost:9200/blogs/normal/format-doc-001/_update -d '
{
"script" : "ctx._source.views = 0; ctx._source.tags = [new_tag]",
"params": {
"new_tag": "java"
}
}
'

# 获取文档
curl -XGET http://localhost:9200/blogs/normal/format-doc-001

{
"_index": "blogs",
"_type": "normal",
"_id": "format-doc-001",
"_version": 3,
"found": true,
"_source": {
"create_at": "2017-07-18",
"author": "Format",
"title": "springboot in action",
"tags": [
"java"
],
"views": 0
}
}

# 使用脚本局部更新新创建的文档
curl -XPOST http://localhost:9200/blogs/normal/format-doc-002/_update -d '
{
"script" : "ctx._source.views+=1"
}
'

# 报错,因为id为format-doc-002的文档不存在

{
"error": {
"root_cause": [
{
"type": "document_missing_exception",
"reason": "[normal][format-doc-002]: document missing",
"shard": "0",
"index": "blogs"
}
],
"type": "document_missing_exception",
"reason": "[normal][format-doc-002]: document missing",
"shard": "0",
"index": "blogs"
},
"status": 404
}

# 加上upsert参数(设置字段的初始值)

curl -XPOST http://localhost:9200/blogs/normal/format-doc-002/_update -d '
{
"script" : "ctx._source.views+=1",
"upsert": {
"views": 1
}
}
'

# 获取文档
curl -XGET http://localhost:9200/blogs/normal/format-doc-002

{
"_index": "blogs",
"_type": "normal",
"_id": "format-doc-002",
"_version": 1,
"found": true,
"_source": {
"views": 1
}
}

9.检索多个文档(Multi Get API)

可以在一个请求中获得多个文档数据。

1
2
3
4
5
6
7
8
9
10
11
12
13
14
15
16
17
18
19
20
21
22
23
24
25
26
27
28
29
30
31
32
33
34
35
36
37
38
39
40
41
42
43
44
45
46
47
48
49
50
51
52
53
54
55
56
57
58
59
60
61
62
63
64
65
66
67
68
69
70
71
72
73
74
75
76
77
78
79
80
81
82
83
84
85
86
87
88
89
90
91
92
93
94
95
96
97
98
99
100
101
102
103
104
105
106
107
108
109
110
111
112
113
114
115
# 在所有索引中执行mget,在参数中指定索引
curl -XGET http://localhost:9200/_mget -d '
{
"docs" : [
{
"_index" : "blogs",
"_type" : "normal",
"_id" : "format-doc-001"
},
{
"_index" : "blogs",
"_type" : "normal",
"_id" : "format-doc-002"
}
]
}
'

# 结果
{
"docs": [
{
"_index": "blogs",
"_type": "normal",
"_id": "format-doc-001",
"_version": 3,
"found": true,
"_source": {
"create_at": "2017-07-18",
"author": "Format",
"title": "springboot in action",
"tags": [
"java"
],
"views": 0
}
},
{
"_index": "blogs",
"_type": "normal",
"_id": "format-doc-002",
"_version": 1,
"found": true,
"_source": {
"views": 1
}
}
]
}

# 基于特定的索引做mget
curl -XGET http://localhost:9200/blogs/_mget -d '
{
"docs" : [
{
"_type" : "normal",
"_id" : "format-doc-001"
},
{
"_type" : "normal",
"_id" : "format-doc-002"
}
]
}
'

# 基于特定的索引和类型做mget
curl -XGET http://localhost:9200/blogs/normal/_mget -d '
{
"docs" : [
{
"_id" : "format-doc-001"
},
{
"_id" : "format-doc-002"
}
]
}
'

# 简化版的基于特定的索引和类型做mget
curl -XGET http://localhost:9200/blogs/normal/_mget -d '
{
"ids": ["format-doc-001", "format-doc-002"]
}
'

# 过滤source中的属性
curl -XGET http://localhost:9200/_mget -d '
{
"docs" : [
{
"_index": "blogs",
"_type": "normal",
"_id" : "format-doc-001",
"_source": ["title", "author"]
},
{
"_index": "blogs",
"_type": "normal",
"_id" : "format-doc-002",
"_source": false
},
{
"_index": "blogs",
"_type": "normal",
"_id" : "format-doc-003",
"_source": {
"include": ["title"],
"exclude": ["author"]
}
}
]
}
'

10.批量操作(bulk)

批量操作可以实现同一个请求操作多个文档的过程。需要注意的是bulk操作Http Body中的格式,对文档进行处理的话需要使用换行。比如创建新文档,更新文档都需要使用换行把创建目录和文档数据进行分割。不同的操作也需要用换行进行分割,比如创建文档和删除文档。

1
2
3
4
5
6
7
8
9
10
11
12
13
14
15
16
17
18
19
20
21
22
23
24
25
26
27
28
29
30
31
32
33
34
35
36
37
38
39
40
41
42
43
44
45
46
47
48
49
50
51
52
53
54
55
56
57
58
59
60
61
62
63
# 3个批量操作,分别是创建文档,更新文档以及删除文档
# 创建文档的时候需要使用换行分割开创建目录和文档数据
# 更新文档的时候也需要使用换行分割开创建目录和文档数据
# 最后一个操作需要使用换行结束
curl -XPOST http://localhost:9200/_bulk --d '
{ "create": { "_index": "blogs", "_type": "normal", "_id": "format-bulk-doc-001" } }
{ "title": "Hadoop in action", "author": "Chuck Lam" }
{ "update": { "_index": "blogs", "_type": "normal", "_id": "format-bulk-doc-001" } }
{ "doc": { "create_at": "2017-07-19" } }
{ "delete": { "_index": "blogs", "_type": "normal", "_id": "format-doc-002" } }

'

# 结果
{
"took": 695,
"errors": false,
"items": [
{
"create": {
"_index": "blogs",
"_type": "normal",
"_id": "format-bulk-doc-001",
"_version": 1,
"_shards": {
"total": 3,
"successful": 3,
"failed": 0
},
"status": 201
}
},
{
"update": {
"_index": "blogs",
"_type": "normal",
"_id": "format-bulk-doc-001",
"_version": 2,
"_shards": {
"total": 3,
"successful": 3,
"failed": 0
},
"status": 200
}
},
{
"delete": {
"_index": "blogs",
"_type": "normal",
"_id": "format-doc-002",
"_version": 2,
"_shards": {
"total": 3,
"successful": 3,
"failed": 0
},
"status": 200,
"found": true
}
}
]
}
如果觉得我的文章对您有用,请随意打赏。您的支持将鼓励我继续创作!
本文作者:Format
原文链接: http://fangjian0423.github.io/2017/07/24/es-cluster-notes/
版权归作者所有,转载请注明出处